• How Melodic Texture Brings Music to Life

    Melodic texture is one of the most immediate ways we experience music. Long before we think about harmony or rhythm, we follow the shape of a line, how it rises, falls, stretches, and returns. A single melody can feel spacious or intimate, depending on how it’s shaped and supported.

    A solitary melodic line has a kind of purity. With nothing else around it, every contour matters. The smallest inflection, a gentle swell, a slight delay, a softened landing, becomes expressive. It’s like hearing a single voice in a quiet room, where the space around the sound is part of the music.

    When melodies move together, the texture changes. Two lines can mirror each other, weave around each other, or drift in parallel. Even when the harmony stays simple, the interaction5 between the lines creates a sense of conversation. The listener feels the relationship: sometimes close, sometimes independent, sometimes gently leaning into one another.

    Small choices inside the melody shape its character. A skip instead of a step can open the sound; a held note can create stillness; a passing tone can soften the edge of a phrase. These details guide the emotional direction of the line without altering the underlying notes on the page.

    What fascinates me is how melodic texture can shift the listener’s focus.

    A single line invites attention inward, toward nuance and breath.

    Multiple lines invite the ear outward, toward interplay and motion. Both are simple on the surface, yet endlessly expressive in practice.

    Melodic texture is one of the crafts of music‑making, the art of shaping a line so it feels alive.

  • Understanding Cadences: The Punctuation of Music (Non-members)

    Cadences are one of the most important concepts in tonal music. They act like punctuation marks. They shape phrases, clarify structure, and help listeners understand where the music is going.

    If intervals and chords give us the vocabulary of harmony, cadences give us the grammar. They tell us when a musical idea pauses, concludes, or takes an unexpected turn.

    This non-members tutorial introduces the core cadence types you’ll encounter in tonal music, and explore the Perfect Authentic Cadence in detail, with clear examples and voice‑leading notes. It’s designed as a foundational guide, something students, teachers, and arrangers can return to repeatedly.

    If you wish to learn more about cadences please consider signing up for silver membership where you will have access to all of the full tutorials and reference sheets enabling you to construct your own composers toolkit.

    What Is a Cadence?

    A cadence is a harmonic event at the end of a phrase that creates a sense of closure, pause, or continuation.

    In tonal music, cadences are built from two essential ingredients:

    • A harmonic progression (usually two chords)
    • A melodic shape (often in the soprano)

    Together, they create a musical “full stop,” “comma,” or “question mark.”

    Cadences help listeners understand:

    • where phrases begin and end
    • how strong or weak a musical conclusion feels
    • whether the music is finished or continuing
    • how tension and release are shaped

    There are five core cadence types

    • Perfect Authentic Cadence (PAC)
    • Imperfect Authentic Cadence (IAC)
    • Plagal Cadence
    • Half Cadence (HC)
    • Deceptive Cadences

    We will look at each of these in detail.

    The Five Core Cadence Types

    Below are the foundational cadences every musician should know. These are the ones you’ll see in classical repertoire, hymns, choral writing, and most tonal music.

    Perfect Authentic Cadence (PAC)

    Progression: V – I
    Requirements:

    • Both chords in root position
    • Soprano ends on scale degree 1
    • Bass ends on scale degree 1

    Effect: A strong, conclusive ending — the musical equivalent of a full stop.

    Example (C major):

    • G major – C major
    • Soprano: B – C
    • Bass: G – C

    Voice‑leading notes:

    • Keep the leading tone (B) rising to C
    • Avoid doubling the leading tone
    • Aim for smooth inner‑voice motion

    Where you’ll see it:

    • Final cadences in hymns
    • Ends of movements
    • Strong phrase endings

    If you would like to learn more about cadences then please consider signing up for silver membership where you will have access to all of the full tutorials and reference sheets enabling you to construct your own composers toolkit.

  • How Rhythmic Texture Shapes the Motion of Music

    Rhythmic texture is one of those musical elements we feel instantly, even before we can describe it. It’s the character that emerges not from the notes themselves, but from how rhythms interact, overlap, and breathe together. Two musicians can play the same pattern, yet the energy can feel completely different depending on how the rhythms are layered.

    A sparse rhythmic texture, where ideas have space around them, creates clarity and calm. It feels like open air. Each gesture stands on its own, and the listener has time to absorb the shape of the phrase.

    A denser texture, with interlocking patterns or repeated figures, builds momentum and drive. It’s the difference between a single footstep and the pulse of many feet moving in sync.

    Small choices inside the rhythm can change the entire feel of a passage. A shifted accent can tilt the groove forward; a syncopation can add lift or surprise; even the decision to leave a beat empty can create tension or release. These details shape the emotional direction of the music without altering the underlying meter.

    What fascinates me is how rhythmic texture can transform the listener’s sense of motion. The same tempo can feel spacious or urgent depending on how the rhythms are arranged. It’s a reminder that rhythm isn’t only about counting beats, it’s about shaping time in a way that feels alive.

    Rhythmic texture is one of the quiet crafts of music‑making. Often unnoticed, always felt, and essential to how a piece moves.

  • How Harmonic Texture Shapes the Emotional Colour of Music

    Harmonic texture is one of those quiet musical elements that shapes how we feel a piece long before we consciously notice what the chords are. Two musicians can play the same harmony, yet the emotional colour can be completely different simply because of how the notes are placed.

    A wide texture, with voices spread out across the keyboard or ensemble creates a sense of openness. It feels like space, breath, and light.

    A close texture, where the notes sit tightly together, brings warmth and intimacy. It’s the difference between a horizon and a fireside, even when the underlying chord is identical.

    Small decisions inside the harmony matter more than we often realise. Moving one inner voice up instead of down can brighten the sound; shifting a bass note by a single step can change the entire weight of a phrase. Even the choice to double a note, or not to, subtly alters the balance and colour.

    What fascinates me is how these tiny adjustments can transform the emotional direction of a passage without changing the chord symbols at all. The harmony stays the same on paper, but the experience of it changes. It’s a reminder that music isn’t only built from the notes we choose, but from the way we shape them into a living texture.

    Harmonic texture is one of the quiet crafts of music‑making. Invisible at first glance, but essential to how a piece breathes.

  • PhysMuse on YouTube — quietly beginning

    A new space for short score videos and creative expansion

    A gentle start

    PhysMuse has quietly stepped onto YouTube. No fanfare, no countdown — just a natural extension of what we already do. Clear, teacher‑friendly music materials. The first videos are short score clips, simple and direct, designed to show the engraving and playback together, although the playback does not lend itself to perfect reproduction in video it does get the essence across.

    What’s there now

    At the moment, the channel holds a small collection of basic score videos. Short, self‑contained pieces that let you see and hear the notation mostly as it appears in the PhysMuse catalogue. They’re quick to watch, easy to share, and ideal for teachers introducing new pieces.

    What’s coming next

    This is only the beginning. Over the coming weeks, the channel will expand to include:

    • Longer scores and fuller arrangements
    • Instrument demonstrations
    • Tutorials and walkthroughs for educators and learners
    • Occasional behind‑the‑scenes posts about engraving and workflow

    Each new video will build on the same PhysMuse principles — clarity, accessibility, and creative curiosity.

    Why YouTube fits

    It’s the most natural way to connect the visual and the musical sides of PhysMuse. The channel becomes a living catalogue: a place where notation meets sound, and where teachers and students can explore the material before downloading or purchasing.

    Closing thought

    This isn’t an announcement so much as a quiet beginning. The channel is live, the first videos are up, and the rhythm of new uploads will follow the same steady pattern as our blog posts and catalogue updates.

    The feature video now live is the guitar edition of She’ll Be Coming ’Round the Mountain, which you can watch on the PhysMuse YouTube channel.

    The youTube channel itself is PhysMuse.

  • Understanding Cadences: The Punctuation of Music (Silver Members)
  • What’s the Difference Between Level 1 and Level 2 Piano Reductions?

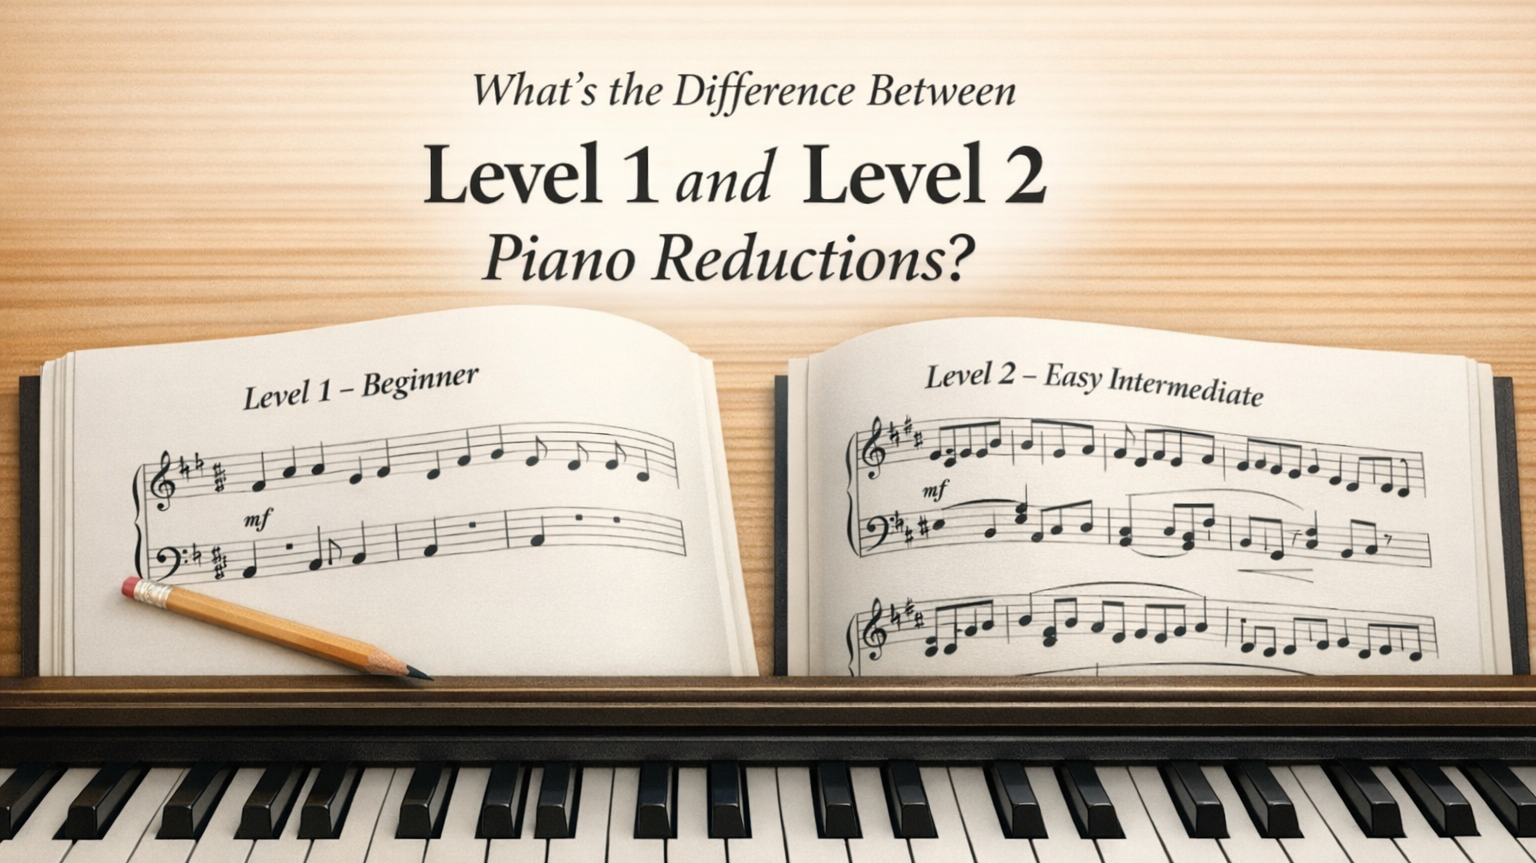
    As the PhysMuse catalogue continues to grow, I’ve been refining the way I approach piano reductions, especially now that many of the newer pieces include both a Beginner (Level 1) and an Easy Intermediate (Level 2) version.

    Even though the catalogue wasn’t originally levelled, the distinctions have become clearer as the engraving style has matured.

    This post outlines the practical, musical, and engraving differences between Level 1 and Level 2 reductions, at least in my mind, and how those differences shape the workflow behind each score.

    Level 1: The Beginner Foundation

    Level 1 reductions are designed for early‑stage pianists who are still developing:

    • hand position stability
    • basic coordination
    • simple rhythmic reading
    • comfort with open intervals and triads

    From an engraving perspective, Level 1 focuses on clarity and minimalism.

    Musical Characteristics that I try to emphasize

    • Mostly quarter‑note motion
    • Static or near‑static LH positions
    • Open fifths, single bass notes, or simple blocked triads
    • No leaps, no broken‑chord patterns
    • Predictable, repetitive textures
    • Melody always isolated and clearly voiced

    Engraving Characteristics

    • Wide spacing for readability
    • Minimal beaming complexity
    • No cross‑staff textures
    • Simple dynamic markings
    • Clean, uncluttered systems
    • Pedagogical layout: one idea per line whenever possible

    Level 1 is intentionally simple. It’s not meant to impress, it’s meant to teach.

    Level 2: Adding Motion, Shape, and Musical Interest

    Level 2 is where the reduction becomes more musical and less strictly instructional.

    It is still accessible, but it introduces the elements that make a piece feel like a piano solo rather than a piano exercise.

    Musical Characteristics

    • Broken‑chord LH patterns (e.g., bass + chord, or simple arpeggios)
    • Eighth‑note motion to create lift and momentum
    • Slightly wider hand positions
    • More harmonic presence
    • Light syncopation or off‑beat accompaniment
    • A sense of “dance” or “flow” that matches the character of the tune

    This is exactly what happened in the new Skip to My Lou Level 2 reduction: the LH pattern adds bounce without overwhelming the player.

    Engraving Characteristics

    • More detailed beaming (especially with eighth‑note patterns)
    • Slightly denser systems, but still clean
    • More dynamic shaping
    • Clearer alignment between melody and accompaniment
    • Occasional fingerings if pedagogically helpful
    • More intentional spacing to support rhythmic clarity

    Level 2 is still instructional, but it’s also more musical.

    Why the Distinction Matters

    As the catalogue grows, having both levels allows teachers and students to choose the version that fits their needs:

    • Level 1 for absolute beginners
    • Level 2 for early intermediates who want something more engaging

    From a publishing standpoint, the distinction also helps:

    • organise the catalogue
    • build consistent product families
    • structure YouTube playlists
    • create a clear educational progression
    • maintain a recognisable PhysMuse engraving style

    Even though earlier reductions weren’t explicitly labelled, many of them naturally fall into Level 1. The newer pieces now benefit from a clearer, more intentional structure.

    Looking Ahead

    The next steps are to continue refining this two‑level approach while expanding the catalogue with guitar editions, TAB versions, and score videos for YouTube.

    The first playlist will be Amazing Grace, which includes both SATB scores and represents the most complete example of the PhysMuse engraving style so far.

    As always, the goal is simple:

    Clean, accessible, teacher‑friendly music that supports real learning.

  • Building the PhysMuse YouTube Channel – From Short Score Videos to a Full Creative Ecosystem

    Over the past few weeks, I’ve been looking into the next major piece of the PhysMuse ecosystem, a dedicated YouTube channel. The goal is to create a space where music learners, teachers, and curious musicians can explore engraved scores, practical tutorials, and accessible demonstrations across a range of instruments.

    What began as an experiment with short score videos has quickly grown into a much larger vision.

    Starting with Short Score Videos

    The first phase of the channel focuses on short, clean score videos — 20 to 40 seconds each — designed to showcase:

    • clear, teacher‑friendly engraving
    • familiar melodies
    • simple presentation

    These short videos are ideal for early visibility. They load quickly, they’re easy to watch, and they give viewers a taste of the PhysMuse engraving style.

    But they’re only the beginning.

    Expanding Into Longer Formats

    As the catalogue grows, the channel will expand into longer, more substantial videos, including:

    • SATB hymn scores
    • Piano reductions
    • Guitar demonstrations
    • Random instrument videos
    • Tutorials and educational walkthroughs

    Each of these formats offers a different way to explore music:

    • SATB scores highlight voice‑leading and choral clarity
    • Piano reductions show harmonic structure and arrangement choices
    • Guitar videos bring a more personal, performance‑based angle
    • Tutorials support learners and teachers with practical guidance

    Ultimately I am looking at simple foundations leading into deeper, more detailed material.

    Why YouTube Fits Into the PhysMuse Ecosystem

    YouTube is more than a video platform. It becomes a central hub that connects:

    • ArrangeMe scores
    • Blog posts
    • Fiverr and Upwork services
    • Educational resources
    • Future books and courses

    Each video links outward to the rest of the ecosystem, and each platform points back to YouTube.

    Preparing for Launch

    The plan is to launch the channel with a small collection of videos already in place, enough to give viewers a sense of direction and enough for YouTube to understand the niche.

    I am looking at the first five videos now, with more scheduled to follow. Once the initial set is ready, the channel will go live, and new videos will be released regularly.

    This staged approach allows me to not get overwhelmed so easily and keeps the workflow manageable while building momentum.

    What’s Coming Next

    With the blog, ArrangeMe catalogue, Fiverr profile, and YouTube channel all active, the next major milestone will be launching the PhysMuse presence on Upwork. This will complete the core creative ecosystem and allow for a balanced mix of:

    • client work
    • catalogue expansion
    • educational content
    • long‑form projects (including the upcoming book)

    It’s an exciting moment. The foundation is in place, and the next phase is about growth, consistency, and creativity.

    I will post here when the channel launches in case anyone is interested.

  • Mediants (Non-members)

    Mediant or submediant relationships refer to the relative distance of a interval of a third, descending or ascending.

    There are three types of mediant cords used

    • Diatonic Mediants
    • Chromatic Mediants
    • Doubly Chromatic Mediants

    Diatonic Mediants

    Diatonic mediants are located an interval of a third away from the tonic chord, but have the opposite chord quality to the tonic. They are diatonic to the tonic and share two common chord tones.

    For example, in the Key of C major we have diatonic mediants of

    • E minor
    • A minor

    Each of these is a minor chord a third away from C, and each shares two common tones with C major.

    Chord tones

    C Major C – E – G

    • E minor EG – B
    • A minor A – CE

    Why do composers use Diatonic Mediants?

    They allow for smooth voice-leading

    Because they share two common tones, they move with almost no friction. This makes them ideal for:

    • Expanding tonic harmony
    • Creating gentle color shifts
    • Connecting functional areas without strong dominant pull

    They provide subtle color within the key

    They enrich diatonic progressions without destabilizing the key. They are perfect for Classical and early Romantic writing.

    As you can see these can be a great way to add colour to your music. Why not try them out.

    If you would like to learn about the other two types of mediants

    • Chromatic Mediants
    • Doubly Chromatic Mediants

    then please sign up to silver membership where you will have access to all of the full length tutorials and also composition reference sheets. Why not build your own composers toolkit using resources that work for you.

  • Expanding My ArrangeMe Catalogue with Hymns & Choral Arrangements

    As I continue building out the PhysMuse ecosystem, one of my big goals for this year is to expand my ArrangeMe catalogue with more SATB choral works and hymn arrangements. I want to create editions that are clean, readable, pedagogically sound, and genuinely useful to teachers and church musicians.

    To support that growth, I’ve been working through David G. Powell’s Four‑Part Harmony Volumes 1 and 2, and I believe they will quickly become a core part of my daily practice routine.

    Why These Books Matter for SATB Writing

    Powell’s approach is refreshingly practical. Instead of drowning you in abstract theory, he builds four‑part writing from the ground up with

    • Clear, incremental exercises
    • A strong emphasis on voice independence
    • Real‑world harmonic vocabulary
    • Plenty of material that translates directly into choral arranging

    For someone like me, balancing composition, engraving, and educational content creation, across different platforms, these books offer exactly the kind of structured, low‑friction practice that fits into my workflow.

    (paid link) Four-Part Harmony, Volume One

    Cover of Four‑Part Harmony Volume 1 by David G. Powell, blue background with white text.

    Volume 1 focuses on the essentials, covering

    • Diatonic triads in all positions in major and minor keys
    • Dominant and supertonic 7th chords in all positions
    • Principles of voice-leading and chord progression
    • Modulation to the dominant and other closely related keys
    • Sequences
    • Melody writing
    • Binary and ternary form analysis
    • Functional chord symbol and root/quality chord analysis

    It’s the kind of foundational work that pays off immediately when you’re shaping inner voices in a hymn or crafting a clean SATB reduction. I’m working through this volume across April and May, and it’s already sharpening my instincts when I’m drafting new arrangements.

    (paid link) Four-Part Harmony, Volume Two

    Cover of Four‑Part Harmony Volume 2 by David G. Powell, green background with white text.

    Volume 2 moves into richer harmonic territory covering such things as

    • Secondary dominants
    • Modulation
    • Chromaticism
    • More adventurous textures

    This is where the arranging possibilities really open up. Hymns and choral pieces often benefit from subtle harmonic colour—something that feels fresh without straying too far from congregational expectations. Volume 2 gives you the tools to do that tastefully.

    How This Fits Into My ArrangeMe Expansion

    I’m building a catalogue that includes:

    • SATB hymn arrangements (with and without chord symbols)
    • Lead sheets in the PhysMuse style
    • Piano reductions
    • Occasional modernised harmonisations for classroom use

    Working through Powell’s books ensures that every new SATB score is grounded in solid technique. It also helps me maintain consistency across the catalogue, something that matters when you’re building a long‑term, teacher‑friendly library.

    These books are also perfect companions to the choral engraving conventions I’ve been refining recently. Clean harmony and clean engraving leads to editions that musicians actually want to use.

    Why I Recommend These Books to Other Arrangers

    If you’re looking to improve your SATB writing—whether for hymns, choral pieces, or educational arrangements—Powell’s books offer:

    • A structured framework
    • Lots of exercises that build skill s
    • A format that’s easy to integrate into daily practice

    They look to be an effective route forward.

PhysMuse

Even Composers Cry Sometimes

Skip to content ↓